From model to magazine — the whole handbook.
For interior designers first — and the architects and builders alongside them. Set a scheme, render the room true to it, light it with real fixtures. Two things in one place: a step-by-step tutorial series and a numbered map of every tool. Free to keep — search it, print it, or save the PDF.
Tutorials
Eleven short lessons — each is a screenshot, a few steps, and one clear result. Do them in order the first time, then dip back in whenever you need a refresher.
Your first render in 60 seconds
The two-click version
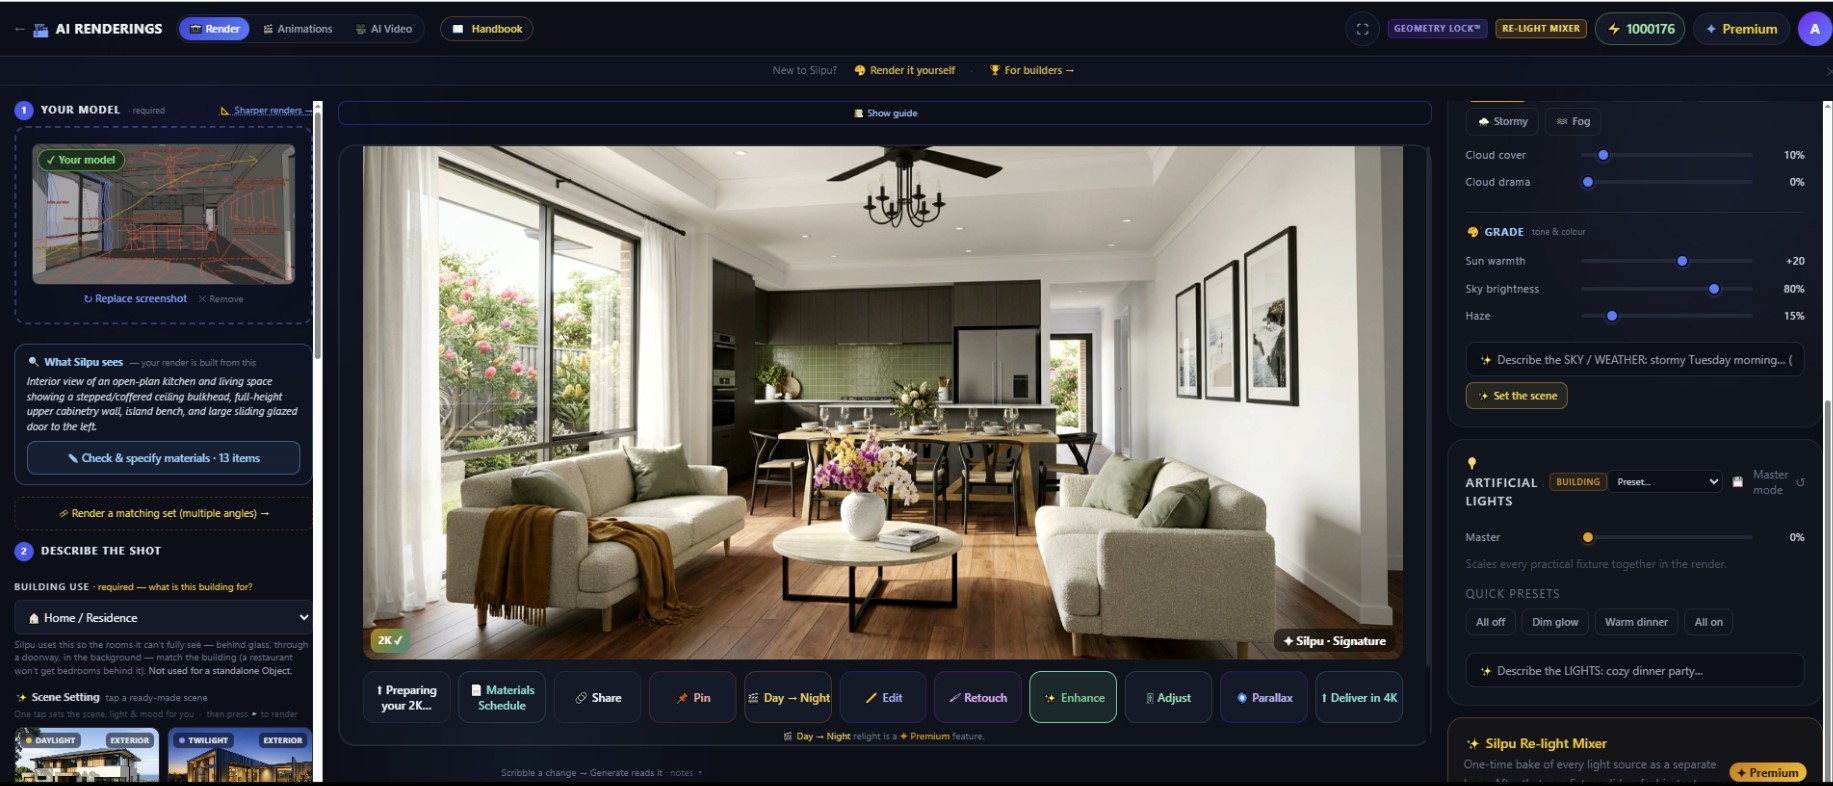
Drop in a screenshot of your model. Press Generate. That is the whole required workflow — the defaults set the scene, light and materials for you. Every other control in this handbook is optional depth, for the day a client says "make that wall red brick" and you want to be obeyed, not surprised. You never need to touch a setting to get a great render.
You'll learn: the whole loop — from a model view to a finished, downloadable render.
file: 01-app-render.png
- Open the render app and drag in a screenshot of your 3D model (SketchUp, ArchiCAD, Revit — or any 3D view).
- Tap a ready-made scene — for example Coastal Daylight or Golden Twilight. It sets the light and mood in one tap.
- Choose your materials. If the scene carries its own finishes, a prompt asks whether to keep your model's own materials (just take the scene's light & style) or use the scene's materials. For a faithful render, keep your model's finishes.
- Press Generate.
- Tell Silpu what the building is for. A quick prompt appears — Home, Office, Café and so on — where you can also note what sits behind the glass or through a doorway. Pick it and Continue to render.
- Your photoreal render appears in the centre in seconds.
- Download it, or keep going — relight it, add finishes, or make a matching set of angles.
Tip You don't need a perfect model — a clear, well-framed screenshot is enough to start. Everything after this lesson is about making it sing.
Getting a good model in
You'll learn: how to give Silpu a clean input — and what you can safely leave out.
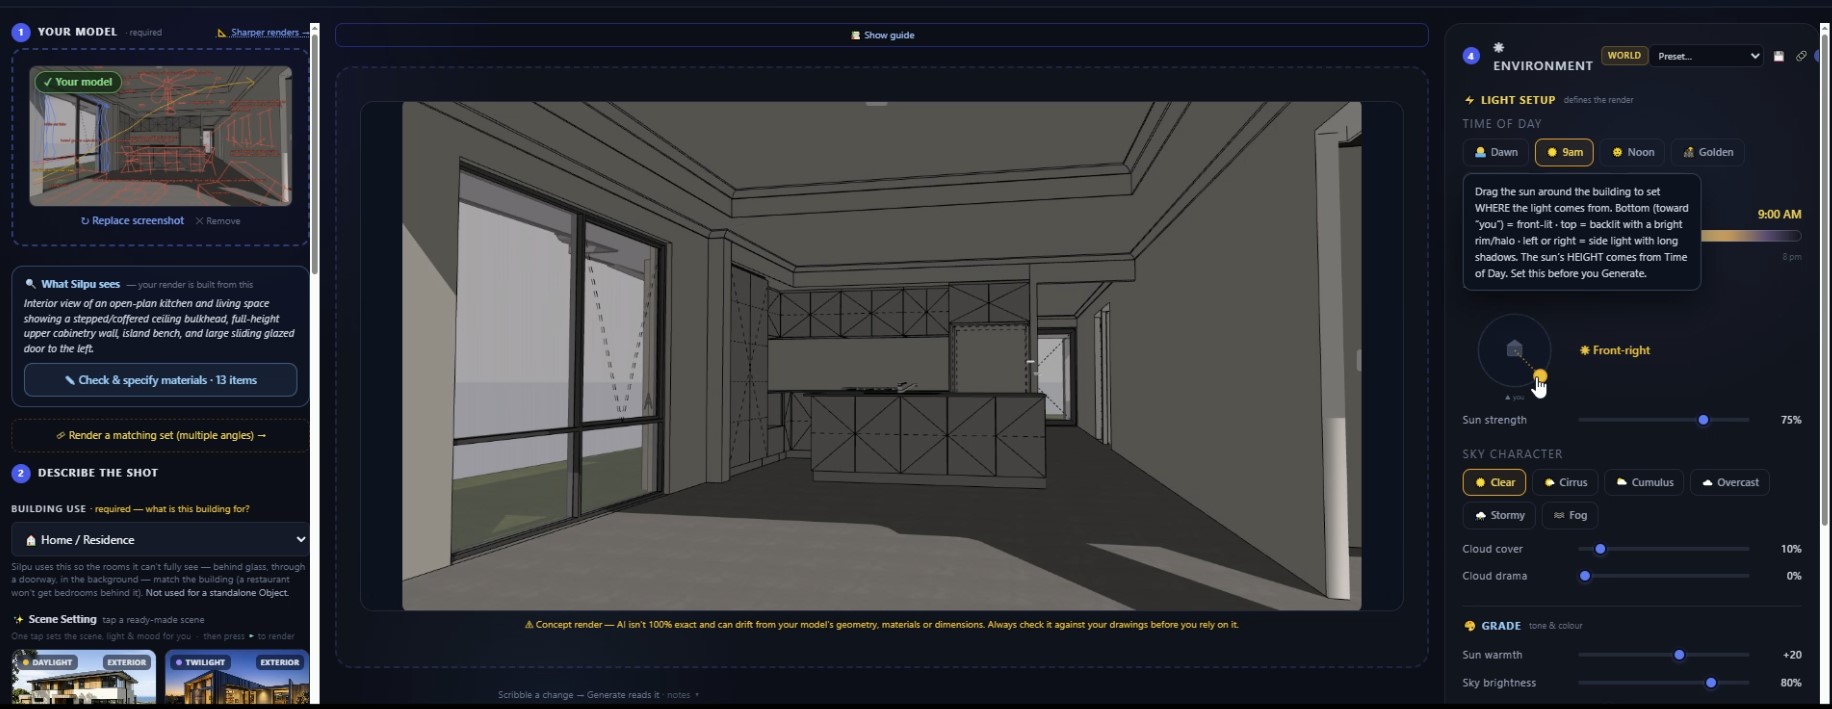
file: 02-upload-what-silpu-sees.png
- Frame the shot in your CAD tool — a clear angle, the whole building in view, minimal clutter behind it.
- Export a screenshot — or skip the export entirely: the free SketchUp, ArchiCAD and Revit plugins send your live view across in one click, and on any other software the free standalone Silpu Studio app keeps the renderer one desktop shortcut away. Download them at silpu.com.
- Drop it into the upload area — drag, tap, or paste. Silpu reads what's there before you render.
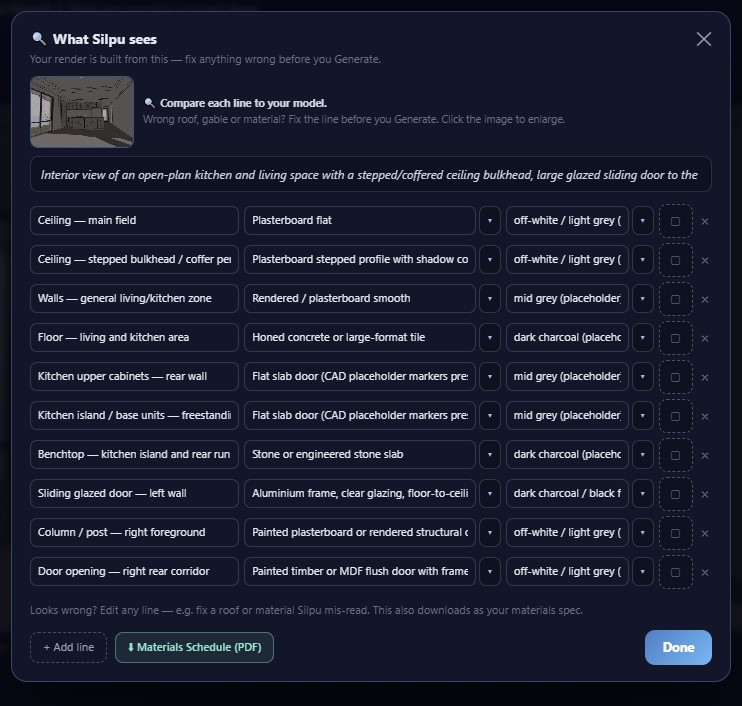
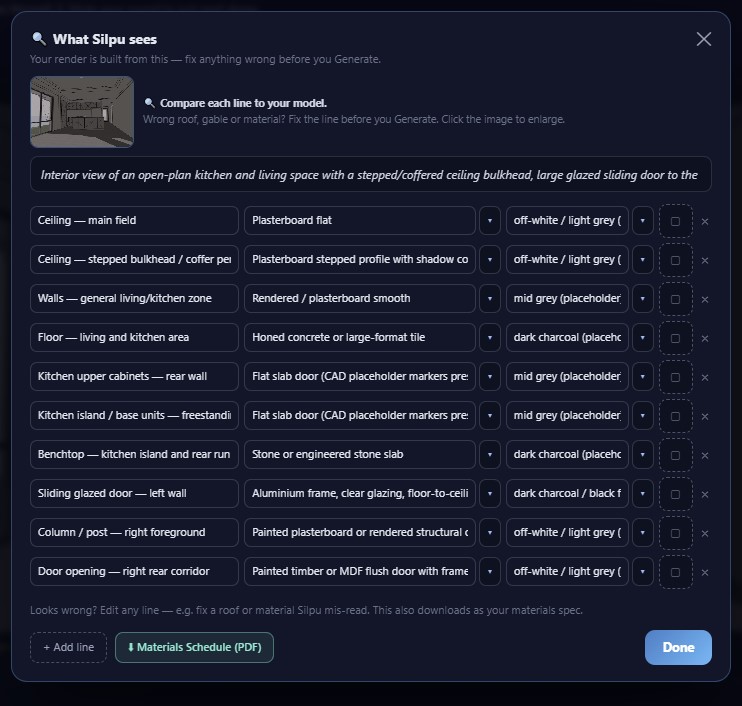
- Check "What Silpu sees" — a plain-English read of your model. If it's right, you're set.
You don't have to furnish or complete the model — or build its world.
Model the building — walls, roof, windows, doors. You don't need to model furniture, fixtures, landscaping, cars or people — and you don't need to model the world around it either: no road, no fence, no neighbouring houses, no streetscape. Silpu dresses the whole scene for you — an empty room renders fully furnished and lit, and a bare block renders sitting on its street, with neighbours, garden and context in place. But if you have specific designs — a particular kitchen, a joinery piece, a garden layout — include them: Silpu holds them faithfully, so you get your design rather than a generic stand-in. Optional is fine; specific is better.
Tip Hidden-line or lightly-shaded views give the cleanest read. One building per shot renders sharper than a whole streetscape at once.
Wide shots Silpu renders every standard frame from tall 9:16 to cinematic 21:9, and your capture keeps its own shape — nothing is cropped away. 21:9 is the widest frame the engine can draw, so for a very long subdivision row or streetscape, capture at 21:9 or closer, or split it into two views — a wider panorama would only come back letterboxed.
Floor plan render — from line drawing to marketing plan
Not just 3D — Silpu renders your 2D drawings too.
Drop in a plain floor plan — a CAD export, a scanned sheet, a screenshot of a PDF page — and Silpu returns it as a colour, furnished, top-down presentation plan: real flooring in every room, furniture matched to each room's label at true plan scale, soft shadows for depth. Every wall, door and window stays exactly where you drew it — the style changes the presentation, never the plan.
You'll learn: how to turn a working drawing into a client-ready marketing plan in one Generate.
- Capture the plan large. Zoom the PDF or CAD sheet to full screen before you snip — crisp room labels in, crisp labels out. A small, blurry capture is the #1 cause of garbled text.
- Drop it into the upload area like any model shot.
- Pick 📐 Floor Plan (2D) in the scene selector. (On Auto, Silpu usually recognises a flat drawing by itself — the chip makes it certain.)
- Choose a Plan style from the dropdown that appears — 🎨 Marketing Colour (the default), 🖌 Watercolour, 🌾 Soft Scandi, ◽ Minimal Grey, 📘 Blueprint, or 🏷 Colour-Coded Zones.
- Say what the building is for as usual — a family home furnishes differently from an office.
- Press Generate. The prompt box is optional here: leave it empty, or use it for finishes ("blackbutt timber floors, sage accents") — your words always win.
Room labels are kept and re-typeset cleanly; dimension strings are dropped — a marketing plan carries names, not measurements. Your working drawing stays the working drawing; this is the one you show the client.
Tip Furnished plans sell rooms, not walls — pair the Marketing Colour plan with a 3D render of the facade and you've got a complete listing page from one drawing set. As always: check the result against your drawings before you rely on it.
Composition & camera — the photographer's eye
You'll learn: the single biggest lever — the angle you choose in CAD is your camera. Compose it like a photographer and the render is halfway to a magazine cover.
03a-exterior-3q-model.jpg
03a-exterior-3q-render.jpg
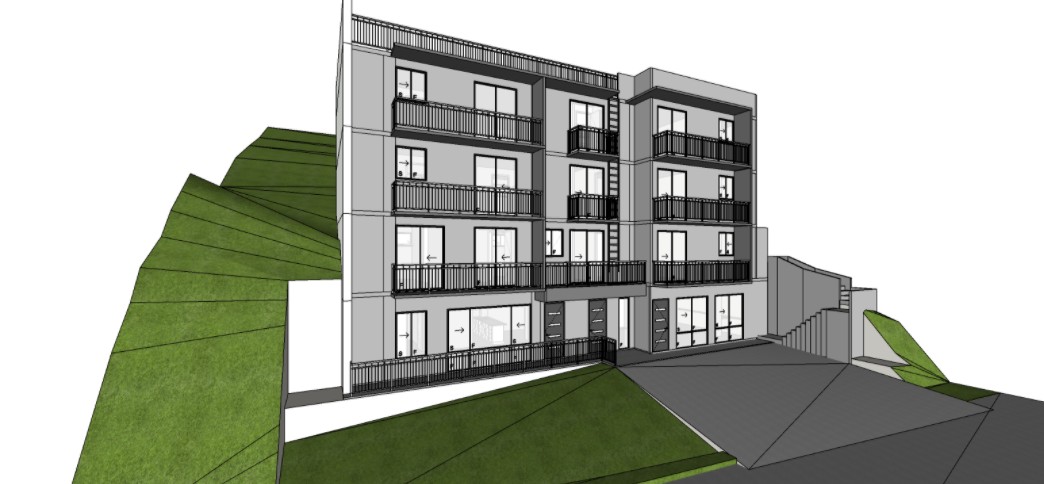
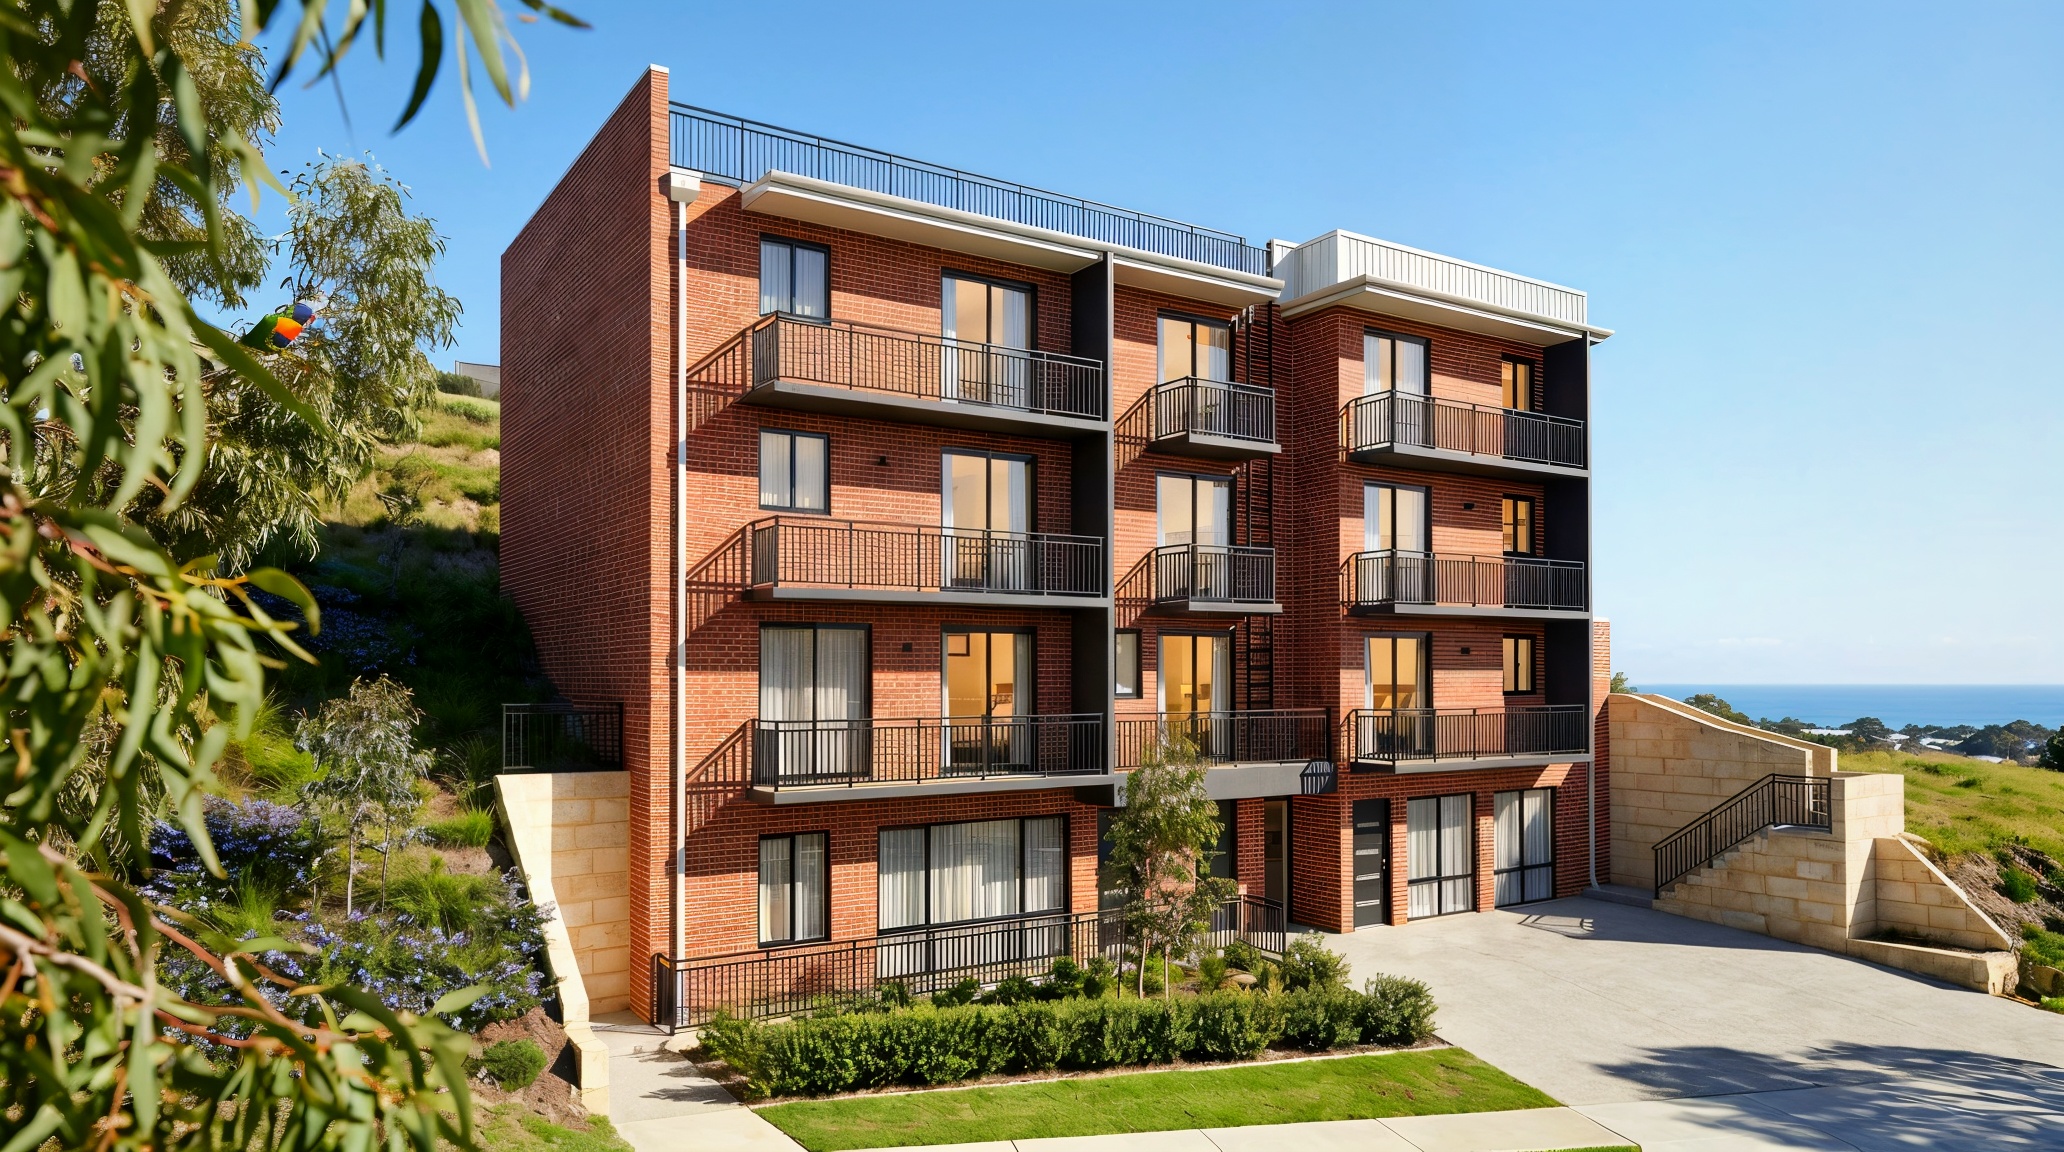
One 3/4 exterior camera, model → magazine. You didn't move the camera — Silpu rendered the exact angle you set in CAD. 3/4 is the exterior workhorse (two faces = form + depth).
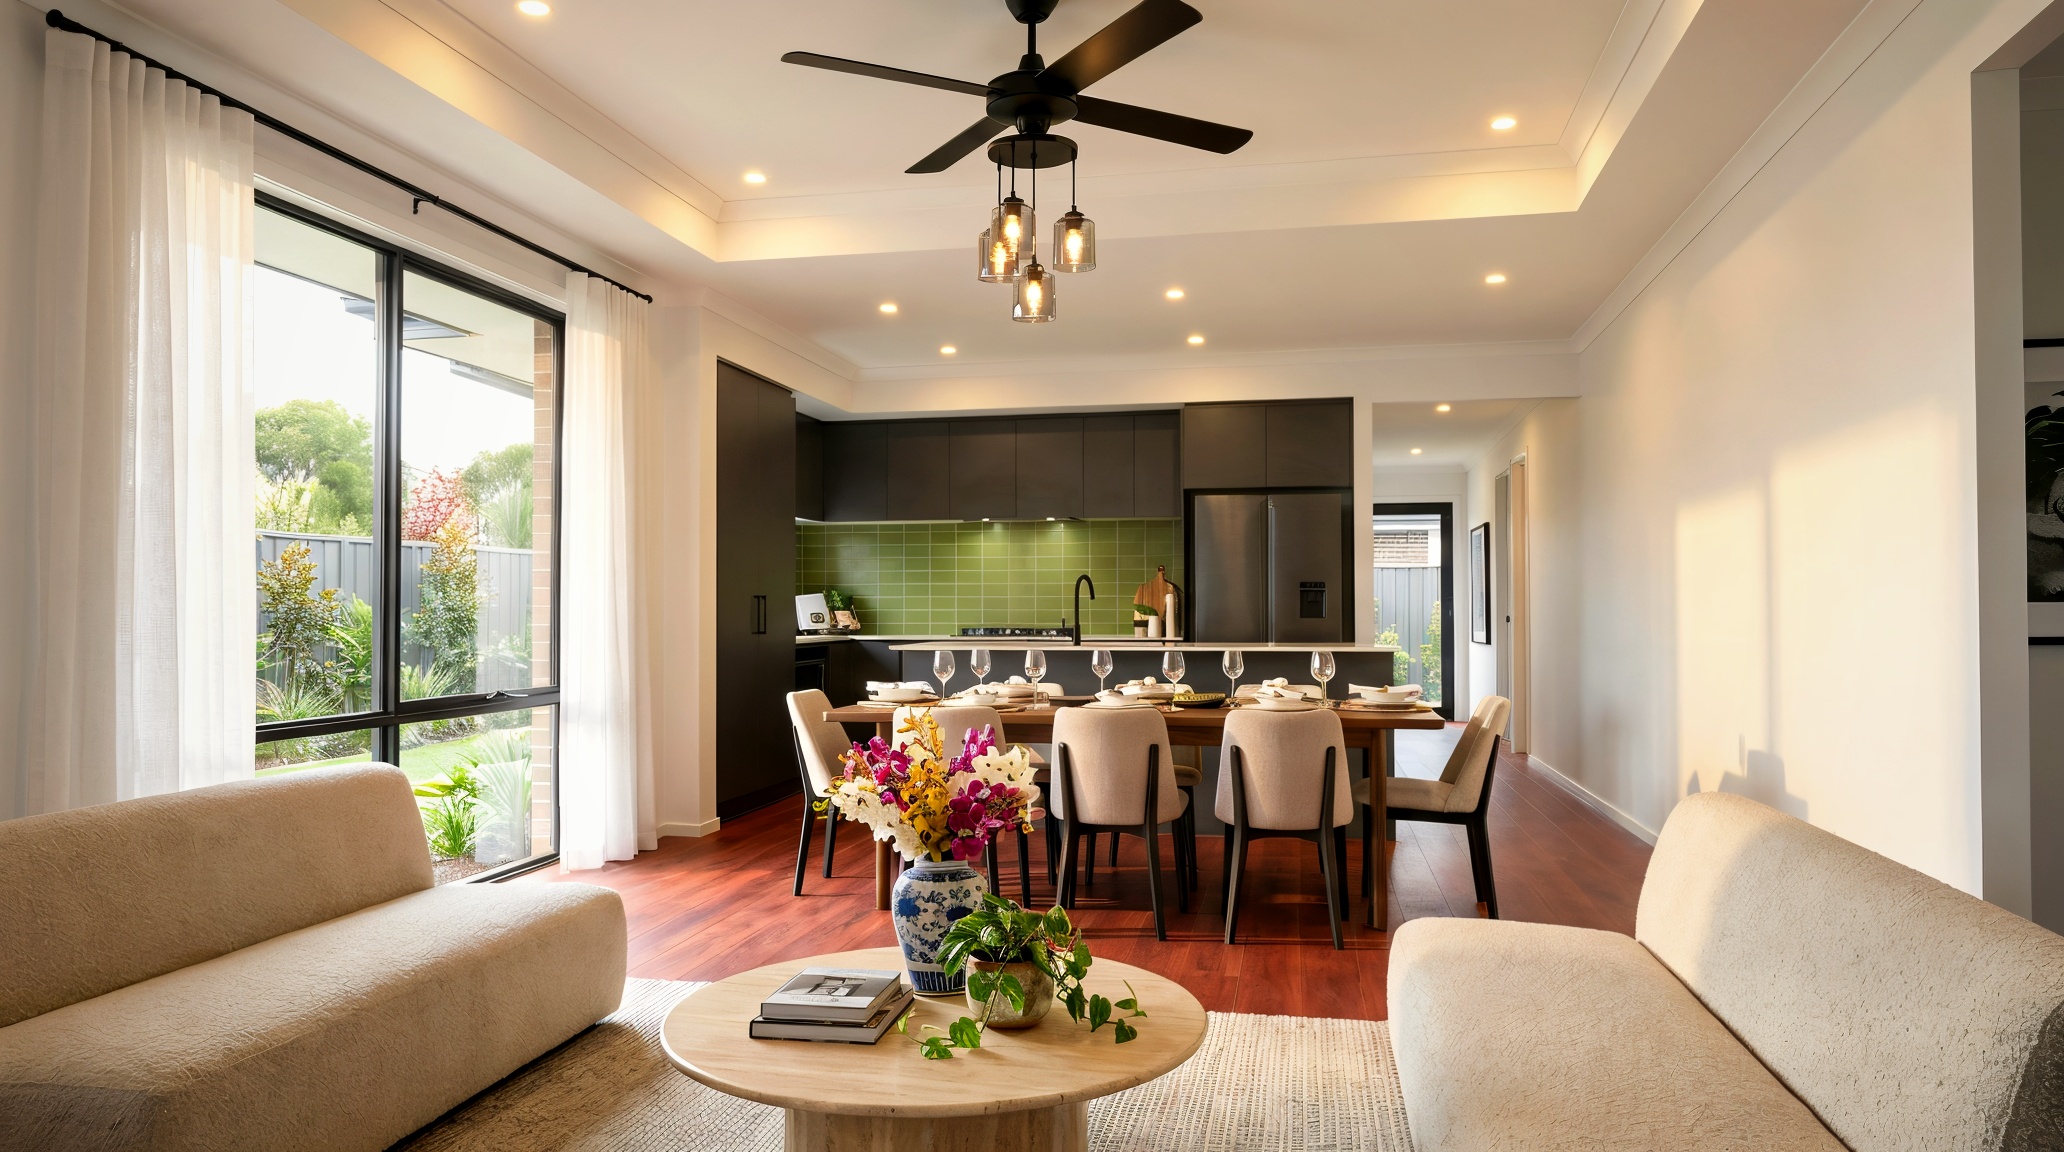
03b-interior-1pt.jpg
Interiors read best as a one-point perspective — stand square to the back wall and let the side walls run to a single vanishing point. Calm, symmetrical, and it makes a room feel deep. (This exact render was directed with a mark-up — you'll meet it in Lesson 06.)
- Pick a hero three-quarter view — show two faces of the building, not a flat-on elevation. Two faces read as form and depth.
- Keep verticals vertical. Don't tilt the camera sharply up or down. A slightly low angle lends quiet grandeur.
- Use the rule of thirds. Place the building off-centre and let sky or landscape breathe into the empty third.
- Give it foreground. A path, driveway or planting leading in draws the eye and adds depth.
- Leave room. Don't crop tight — context sells a home.
Interiors ★ START HERE
- One-point perspective — square to the back wall for calm, symmetrical depth. (A corner two-point view works too, for a looser feel.)
- Camera ~chest height (1.2–1.4m) feels more spacious.
- Let a window be the key light — shoot across or toward it.
- Anchor the foreground — an island or sofa corner gives scale.
- Capture the space, not just objects; verticals true.
Exteriors
- Eye-level (~1.6m) feels natural; drop lower for heroic.
- 3/4 hero angle — front + side, so massing and roof read.
- Golden hour / twilight rakes warm light and makes glazing glow.
- Layer it — foreground planting, building, sky beyond.
- Avoid dead flat midday unless you want the honest daylight look.
Tip Spend your effort here. A great angle in a plain render beats a dull angle with every slider tuned.
Setting the scene & the light
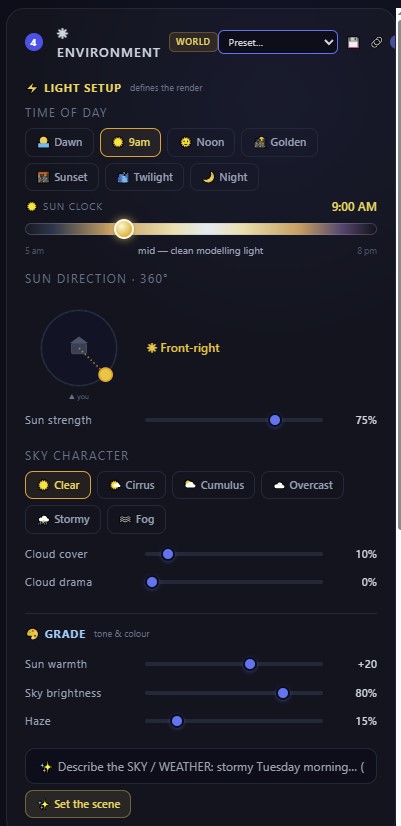
You'll learn: the Environment panel — the difference between a flat render and a magazine cover.
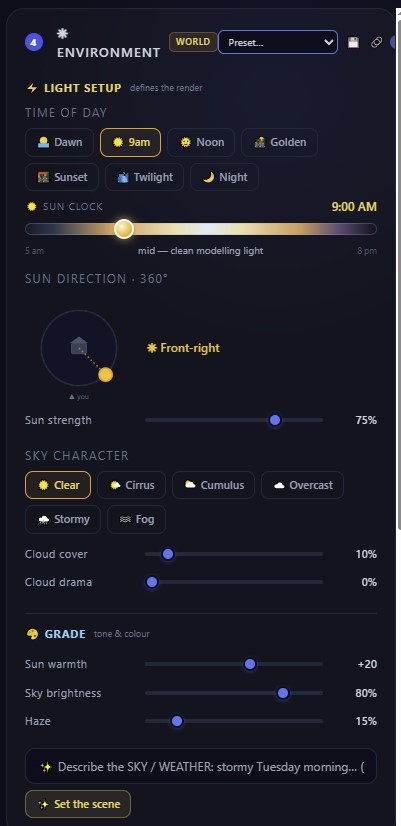
file: 04-environment.png
- Time of day — Dawn to Night. Golden hour and twilight sell a home; midday is the honest "clean modelling light".
- Sun direction & strength — swing the sun to rake light across the facade; dial strength for softer or harder shadows.
- Sky character — Clear, Cirrus, Cumulus, Overcast, with cloud-cover and drama sliders.
- Grade — nudge sun warmth, sky brightness and haze to finish the tone.
- Or just Describe the scene in plain words and Silpu sets the controls to match.
Tip Start from a scene preset, then adjust one or two sliders. Small moves in light do more than big moves anywhere else.
Build the world — Location & Surroundings 🌏
Under 📍 Location sits the Surroundings panel — six setting chips, three tick-boxes and two dropdowns that build the world around your building. One rule governs all of it: everything here is additive. It dresses the scene — it never changes your building's form, lines or materials.
- Region — Auto (from location). Type your project's address and Silpu reads that actual place — the road, the neighbouring homes, even the power poles render true to it. No address? Pick a country from the Region dropdown for an authentic hand-tuned street character. A typed address always beats the dropdown, because a specific suburb is truer than a whole country.
- The setting chips — where the building sits. ✨ Auto lets Silpu choose from your location. 🛣 Street plants it on a real street — road, kerb, footpath, neighbours either side. 🌿 Garden wraps it in established lawns and mature planting, with no street clutter at all. 🌳 Bushland gives native trees, scrub and groundcover. 🏖 Coastal brings dune grasses, hardy planting and a sense of the sea beyond. 🏙 Urban sets it among adjacent buildings, paving, street furniture and signage.
- 💧 Wet road — the ground has just had rain: mirror-like reflections of your building and sky in the paving, but no rain falling. 🚗 Street life — parked and passing cars, people going about their day, a bicycle, the small clutter of a real street — always scaled and placed so nothing blocks the building. 🌿 Clean foreground — removes the near-camera grass and branches that photographers love to frame with, for a clean, unobstructed, elevation-style view.
- 🌦 Weather — governs the sky, the air and everything falling from it: ☀️ Clear, ☁️ Overcast, 🌧 Light rain (rain in the air and every surface wet), 🌫 Fog & mist (the distance dissolves; your building stays crisp), ❄️ Snow (settles on the roof, ground and trees — the building underneath is untouched), ⛈ Storm (dark brooding sky, cinematic contrast), 🌅 Golden haze (warm sun-filled air, the luxury look). Where weather and time-of-day disagree about the sky, the weather wins.
- 🏞 Backdrop — a natural setting placed in the far background: Ocean, Lakeside, Riverside, Waterfall, Mountains or Forest. It sits behind the site with true atmospheric depth and never overlaps or crowds your building.
🛣 Street + 🚗 Street life + ☀️ Clear. A lived-in, believable address — the render that says "this home already exists".
🛣 Street + 💧 Wet road + ☁️ Overcast. Mirror reflections in the paving, soft even light — moody without a drop falling.
🌅 Golden haze + 🚗 Street life, with golden hour set in the Environment panel. The magazine cover.
🏖 Coastal + 🌊 Ocean backdrop + ☀️ Clear. Dune grasses at the fence line, sea on the horizon.
🌳 Bushland + 🏔 Mountains + 🌫 Fog & mist. The ranges dissolve into haze behind native bush — your building stays sharp.
⛈ Storm + 💧 Wet road. Dark sky, lit building, reflections underfoot — cinematic contrast that makes the facade glow.
❄️ Snow, on its own. Fresh snow on the roof and garden, flakes in the air — and every modelled line still exactly yours.
🌿 Clean foreground + 🌿 Garden + ☁️ Overcast. Unobstructed facade in shadowless light — the closest a render gets to a drawing.
Don't double up 🌧 Light rain already wets every surface — tick 💧 Wet road only when you want reflections without falling rain. And pairs that fight (❄️ Snow + 🏖 Coastal) will render, but pick the story you're actually telling.
It works indoors too — the Outlook
On an interior render the same panel becomes what you see through the glass: choose Garden, Street or Coastal and that's the view beyond your existing windows — and the weather outside drives the daylight falling into the room, so a 🌫 foggy outlook gives soft grey light and 🌅 golden haze pours warmth across the floor. Silpu never invents or enlarges a window to show it off — the view lives only in the openings you modelled.
Specifying your finishes
You'll learn: the Materials Schedule — declare finishes instead of leaving them to chance.
file: 05-materials-schedule.png
- Open Materials Schedule and work through the Exterior and Interior tabs.
- Pick from real Australian palettes — Colorbond colours, brick ranges, cladding, stone, flooring, cabinetry. Leave anything on "as modelled".
- For feature materials, set where they go (e.g. stone on the base course).
- Your picks apply to the render automatically — Generate and it builds exactly those finishes.
Tip Naming a finish is the strongest lever you have. A declared "Surfmist roof" beats hoping the render guesses it.
Interior designers: set the whole Direction first ✦
Before you render, lock the scheme on one page — palette, materials, furniture, lighting — then render to it. There's a full mood-board masterclass next, with a live example you can send a client. Every element on the board carries a ready-to-paste mark-up pin, so the board is your render brief.
Build a Direction — the mood board that renders itself
You'll learn: how interior designers decide the whole scheme on one page — palette, materials, furniture, light — before a single render. Lock the "why" once and every render obeys it. This is the move that separates a designer from a button-pusher.
Start from a finished one, then make it yours ✦
Here is a complete, client-ready Direction you can open and copy: Coastal Calm — Interior (with an exterior companion). Every swatch, product and light on it carries a ready-to-paste mark-up pin — so the board isn't decoration, it is your render brief.
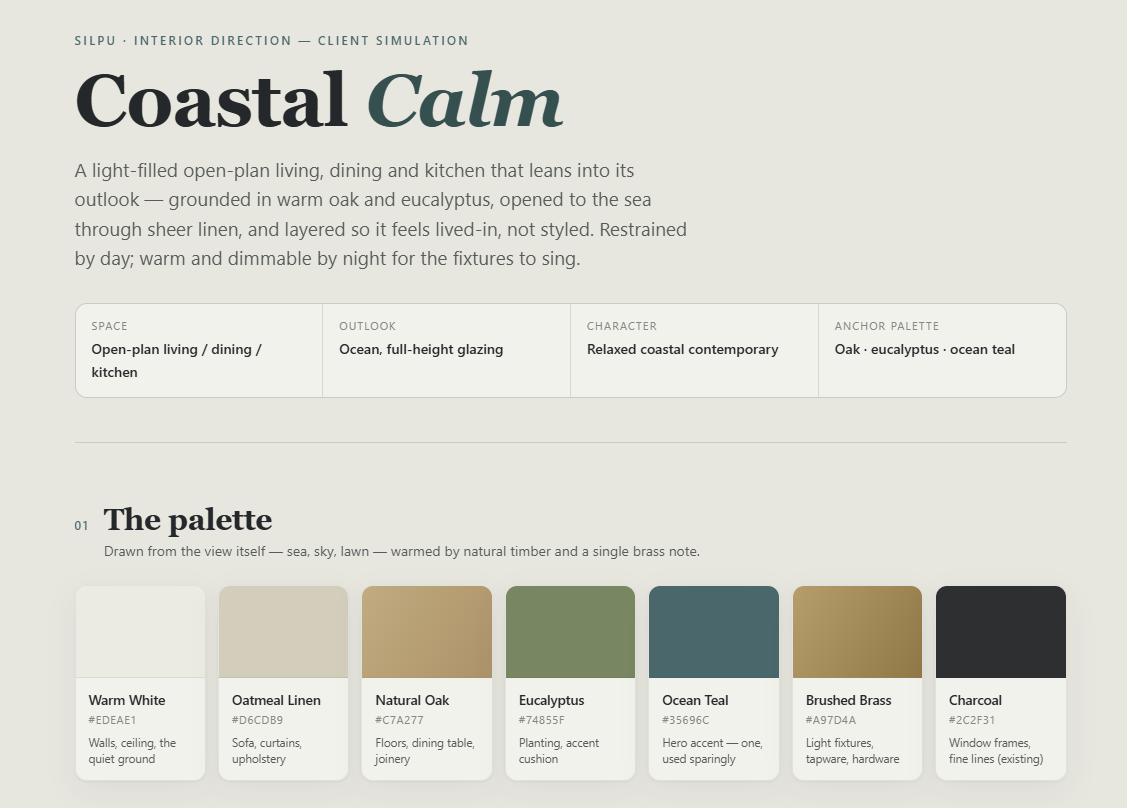
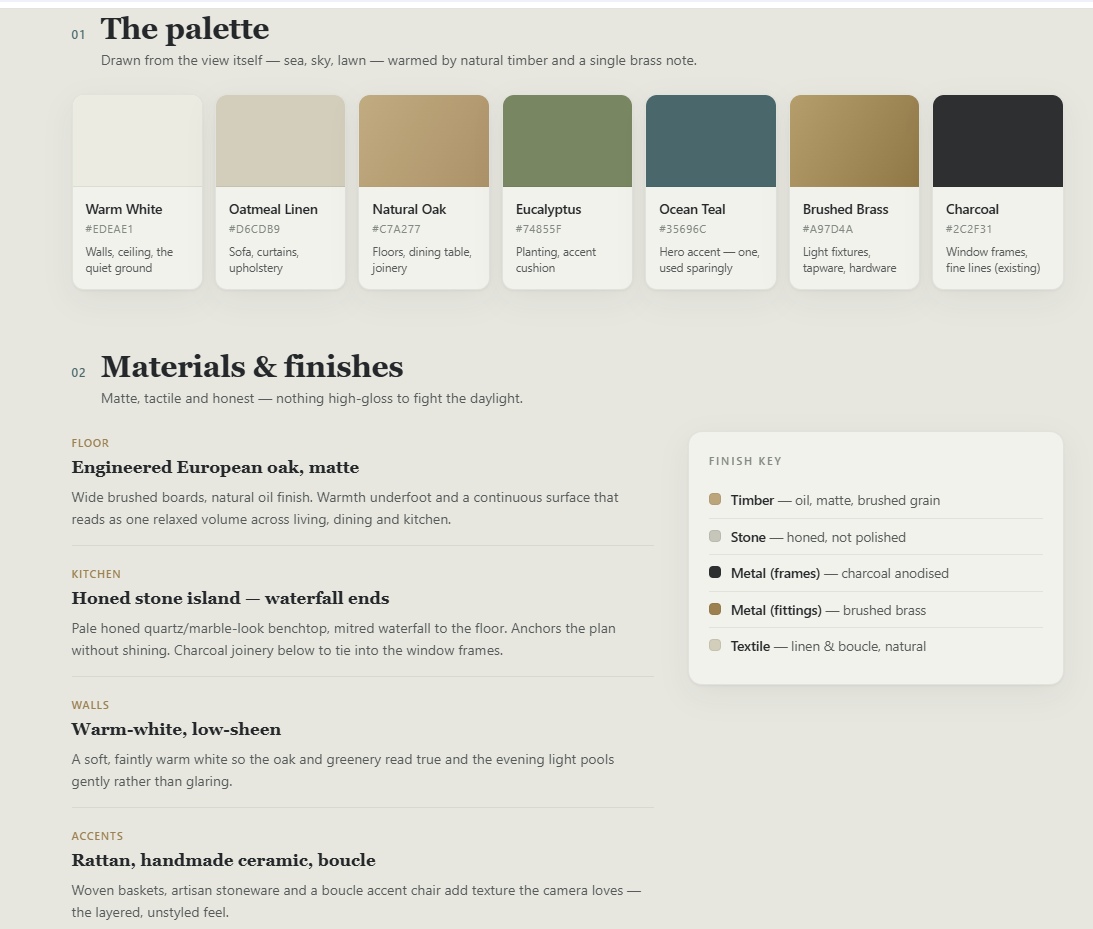
A Direction is a palette + a materials/finishes schedule + hero furniture + a lighting scheme + a shot list — everything the render needs, decided on purpose. Build yours in seven parts:
- Name the feeling. One line at the top governs every choice below — "Coastal Calm: light, airy, natural, unhurried." If a later pick doesn't serve the name, it's the wrong pick.
- Set the palette — 5–6 colours, each with a role. Walls, floor, joinery, stone, and one or two accents. Pull from real product colours (a Dulux, a Colorbond, a tile range) so the scheme is buildable, not just pretty.
- Specify the materials & finishes. Name the actual products — engineered oak floor, honed stone bench, matte-black tapware, the splashback tile. These map one-to-one onto your Materials Schedule (Lesson 05), so the render builds exactly them.
- Choose a few hero pieces. Two or three furniture anchors with real references and honest scale — the sofa, the dining setting, the pendant. Not a whole catalogue; the pieces that set the tone.
- Design the light. Decide the mood (warm and low, or bright and even) and the real fixtures. This is where IES earns its keep — load a fixture's photometric file so the render matches the measured beam, not a generic glow (Lesson 08).
- Write the shot list. The exact views you'll render — a one-point living shot, a kitchen detail, a dusk exterior — each with a one-line brief. On the board, every shot becomes a paste-ready pin.
- Publish & send. The finished board is a link you send the client to sign off the vision — and the same page is the brief you render from. Approve the board, and the renders can't wander.
The board IS THE BRIEF
- Palette + materials → paste straight into your Materials Schedule.
- Each shot's pin → paste into the prompt / mark-up for that render.
- The lighting note → your Re-light + IES setup.
- The client signs the board, not a vague email — fewer revisions.
Stuck for a start?
- Open Coastal Calm and swap it toward your own project.
- Let Studio+'s Interior Designer propose a regional, biophilic scheme, then curate it down to your board.
- Keep it tight — a board that decides everything beats a scrapbook that decides nothing.
Tip The palette and the shot list are the two parts a client reacts to first. Nail those and the sign-off is halfway won.
Direct it in words — prompts & mark-ups that make it sing
You'll learn: how to describe what you want and point at it, so the render lands your intent.
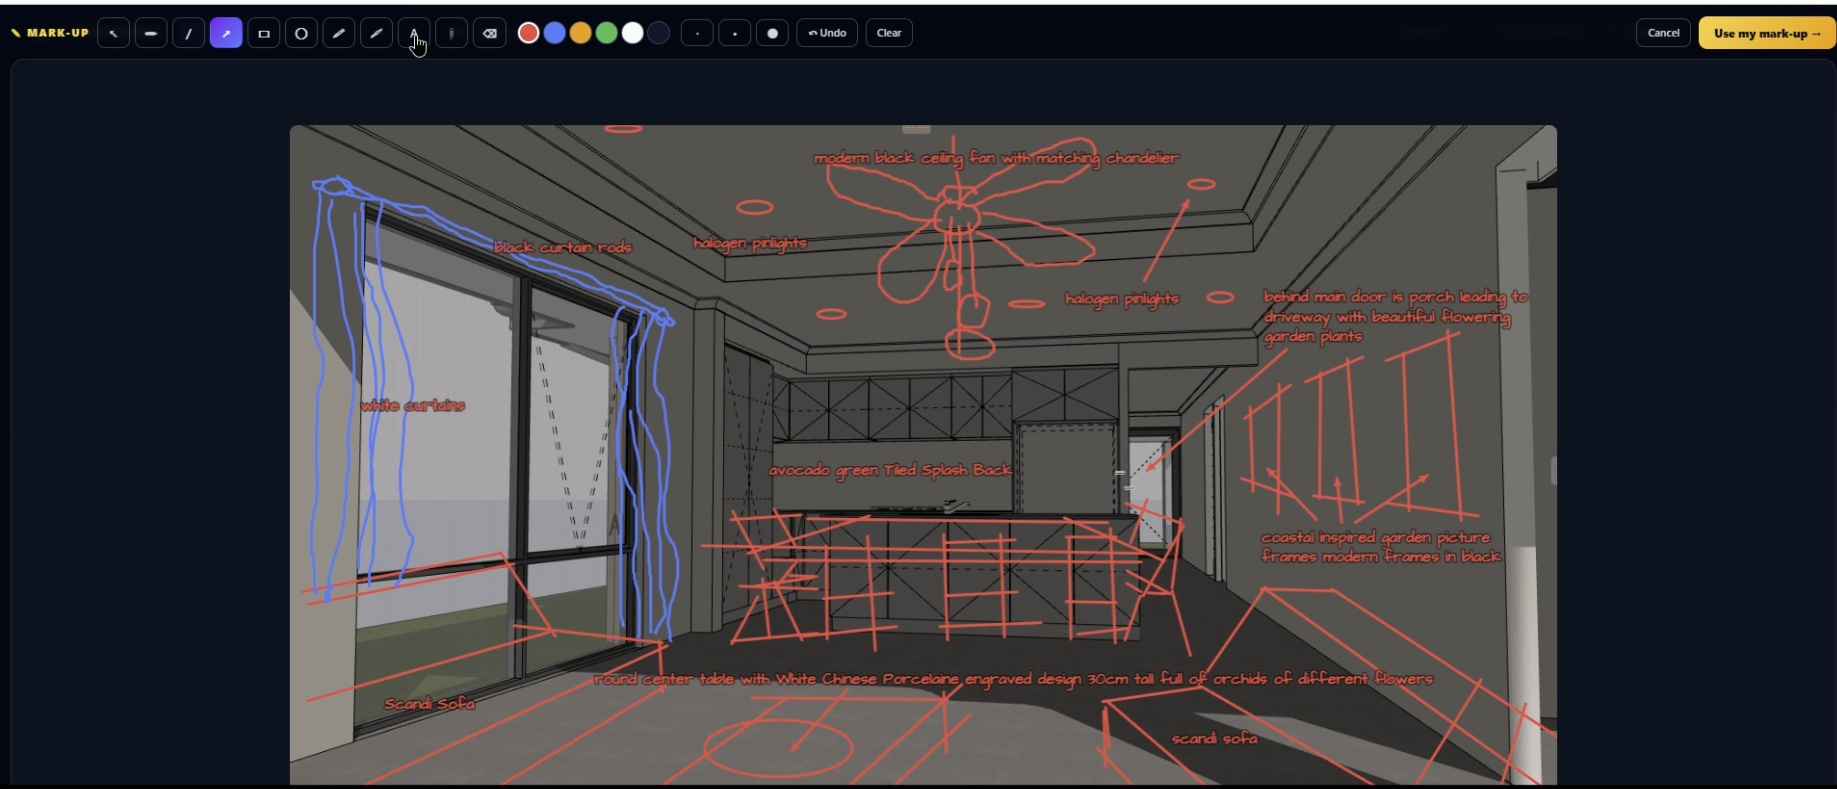
file: 06-markup-prompt.png
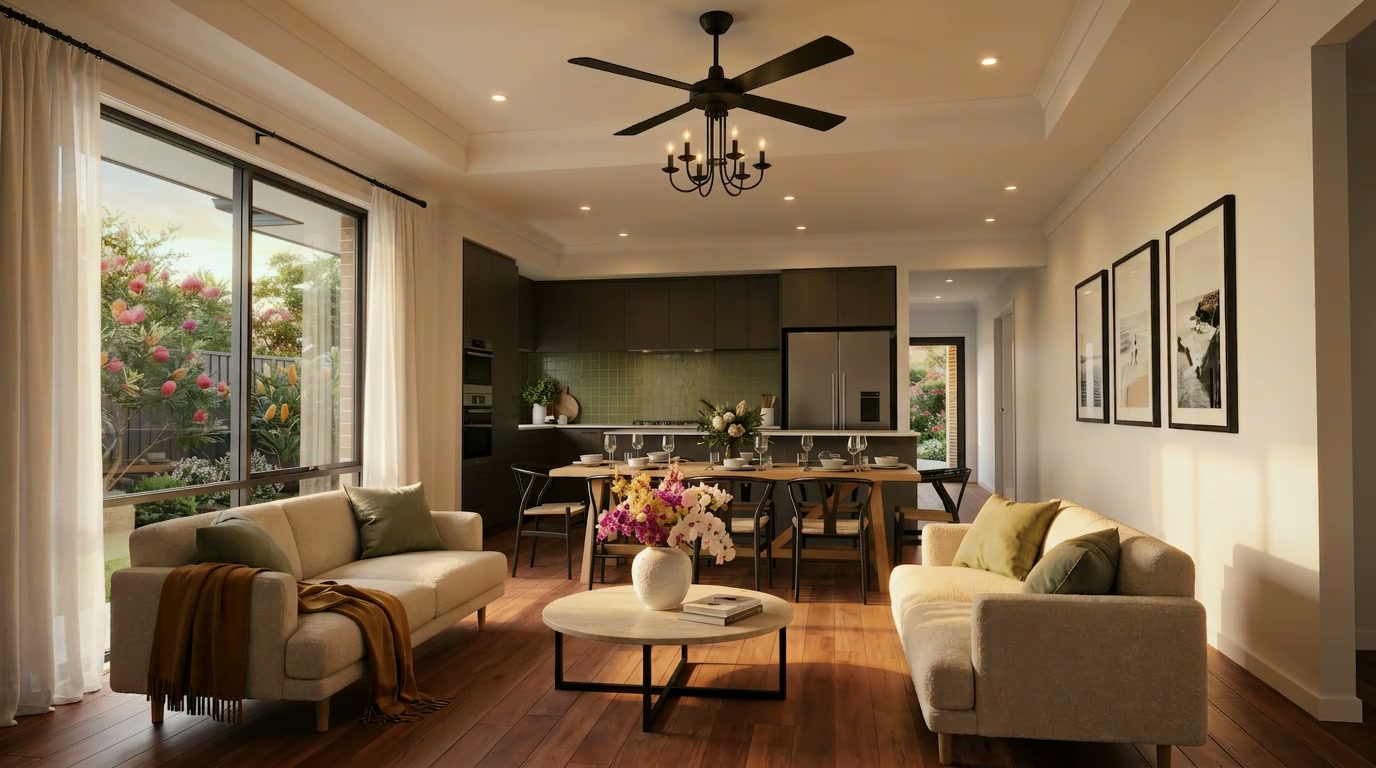
file: 06-outcome-render.jpg
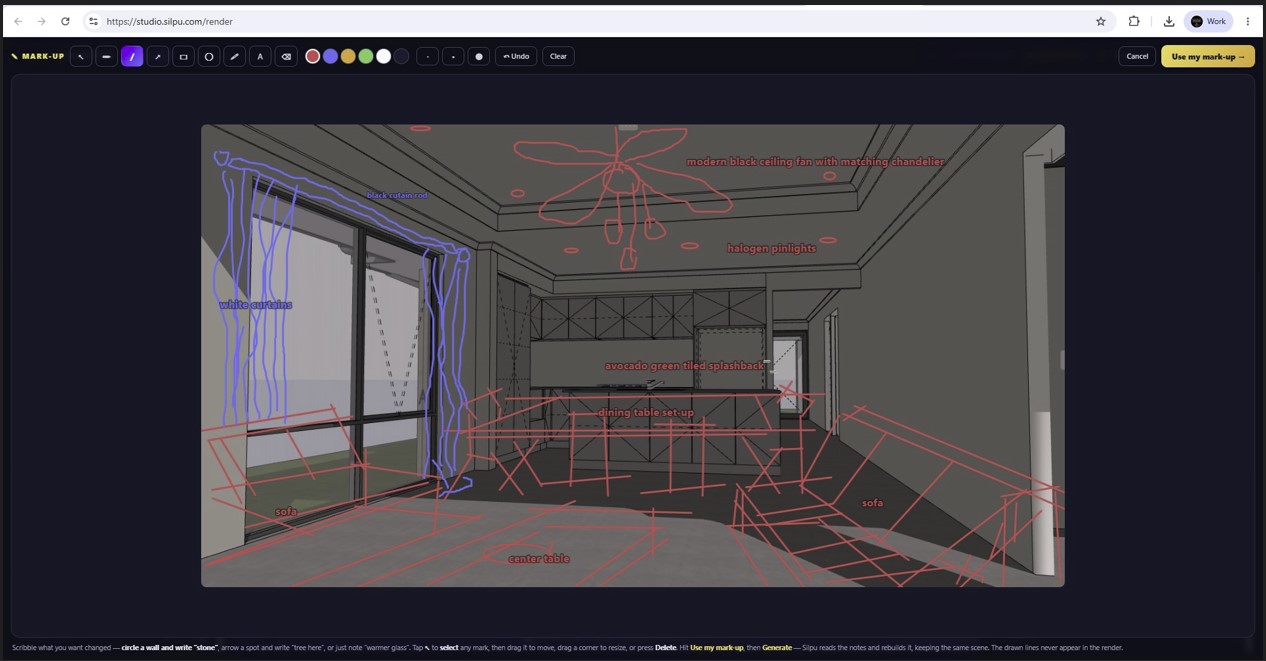
This is the Mark-up — and below it, the Outcome render. Same room, same camera: the scribbles said where (the three framed prints, the fan, the curtains, the lighting), the prompt below said what — and the render landed both.
- Describe, don't command. Plain, sensory language: "soft morning light, warm red brick, calm and uncluttered."
- Say what to keep. Anchor what matters: "keep the black window frames, keep the roofline exactly."
- Open the Drawing Board to direct where. Circle a wall and note it ("this wall = stone"); Silpu reads it.
- Combine the two — mark up for where, describe for feel.
- Change one thing at a time. Adjust, generate, compare.
Your mark-up stays put. Notes and 📎 pinned products ride every re-render of the same model — through a page refresh, and inside a saved .silpu project too, so reopening a job brings its pins back with it. Pin once, render as many times as you like; they only clear when you load a new screenshot or clear the mark-up yourself.
🔁 Revision Lock — for designs that keep moving. When the design changes after a render — a garage flips sides, a window moves — load the revised screenshot and click the 🔁 Revision Lock pill above Generate. Silpu re-takes your previous render around the revised building: same sky, light, landscaping and materials, with only the design change moving. It works across sessions inside a saved .silpu project, and for a perfectly matching camera, capture each revision from the same saved SketchUp Scene.
A simple recipe
Subject + materials (from your schedule) + light & mood + keep-list (what must not change). Four short parts beat one long paragraph.
The real prompt behind that pair — written with the model marked up; together they produced the Outcome render above:
Why still write a prompt IF YOU MARKED IT UP?
- The mark-up says WHERE — you point at the wall, the ceiling, the corner.
- The prompt says WHAT & the mood — light, finishes, feeling. A scribble can't say "true whites, soft morning light."
- Tie them together with a phrase like "as marked up" — it tells Silpu to read your scribbles as instructions, not decoration.
- Never leave the prompt empty just because you drew on it. Words + marks = direction.
That prompt, by recipe part
- 💡 Light & mood — "soft morning daylight, clean and airy, true whites"
- 🎨 Materials — "red Mari hybrid plank 150×600, white walls, black frames"
- 🛋️ Mark-up items — "sofa + centre table + orchid vase; dining set for six"
- 📌 Point back — "as marked up" (say it, so the marks are obeyed)
Tip More words isn't more control. Be specific about the few things that matter — name your light, your finishes and your mark-ups — and let Silpu handle the rest.
Keeping it faithful to your design
You'll learn: how Silpu renders your building — not an invented one.
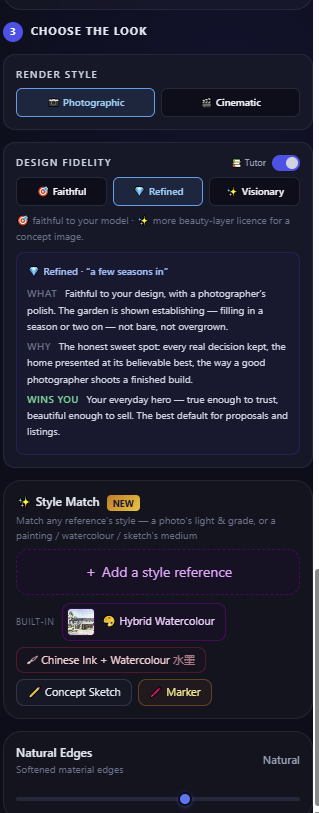
file: 07-choose-the-look.png
- Silpu holds your geometry and materials to the model — windows, rooflines and doors stay where you drew them.
- Open the Drawing Board to point at anything to emphasise or correct before rendering.
- Choose a Design Fidelity — Faithful (true to the model, for sign-off), Refined (a photographer's polish — the everyday hero) or Visionary (more beauty-layer licence for a concept image).
- If a render drifts, re-check "What Silpu sees" and your finishes, then generate again.
- An empty prompt box is a promise — leave it blank and Silpu makes one single, faithful pass: your camera angle, your storey count, your materials, exactly as modelled.
Tip For a client sign-off or a permit conversation, stay faithful. Save the dramatic styling for the hero shot.
New Renders are now drawn at native 2K by the engine itself — zoom into roof sheeting, balustrades and brick coursing and the detail is genuinely drawn, not upscaled. Elevated and drone-style views also gain a real photographer's foreground: soft tree canopy entering the frame at the camera's own height, with your viewpoint never moved to make room for it.
Finishing: relight, edit, interiors
You'll learn: the finishing suite that takes a render from good to done.
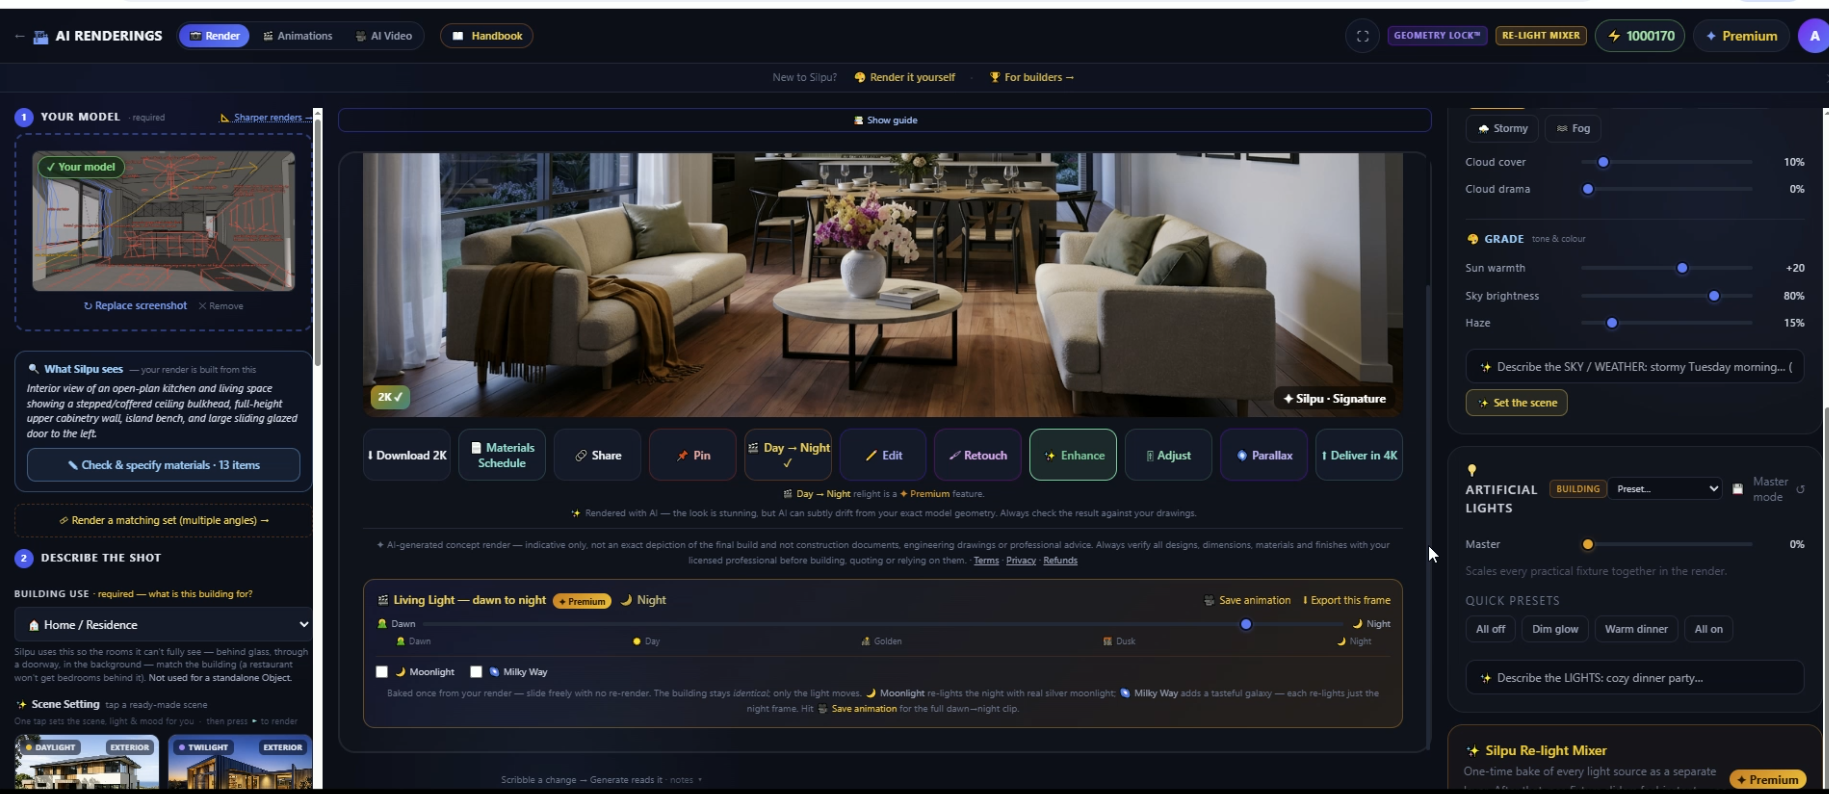
file: 08-relight.png
- Re-light Mixer — adjust the lighting after the render, warmer or cooler, brighter or moodier.
- Day → Night — take one render from daylight to dusk to night, geometry held steady.
- Edit — small changes in words ("add garden beds"). The first several edits on each render are free. Your typed words reach the engine exactly as written, and an outline is an exact extent: mark a bed and describe the planting (agapanthus, shrubs, natives…) and it's planted edge-to-edge inside your line with nothing changed outside it. Mark an object and say remove and it's gone cleanly, the background continued through.
- Add interiors and landscape that match the building and the region.
Tip Edits are generous on purpose — iterate freely. You should never pay to fix a small thing.
Real light, not a guess — IES fixtures ✦
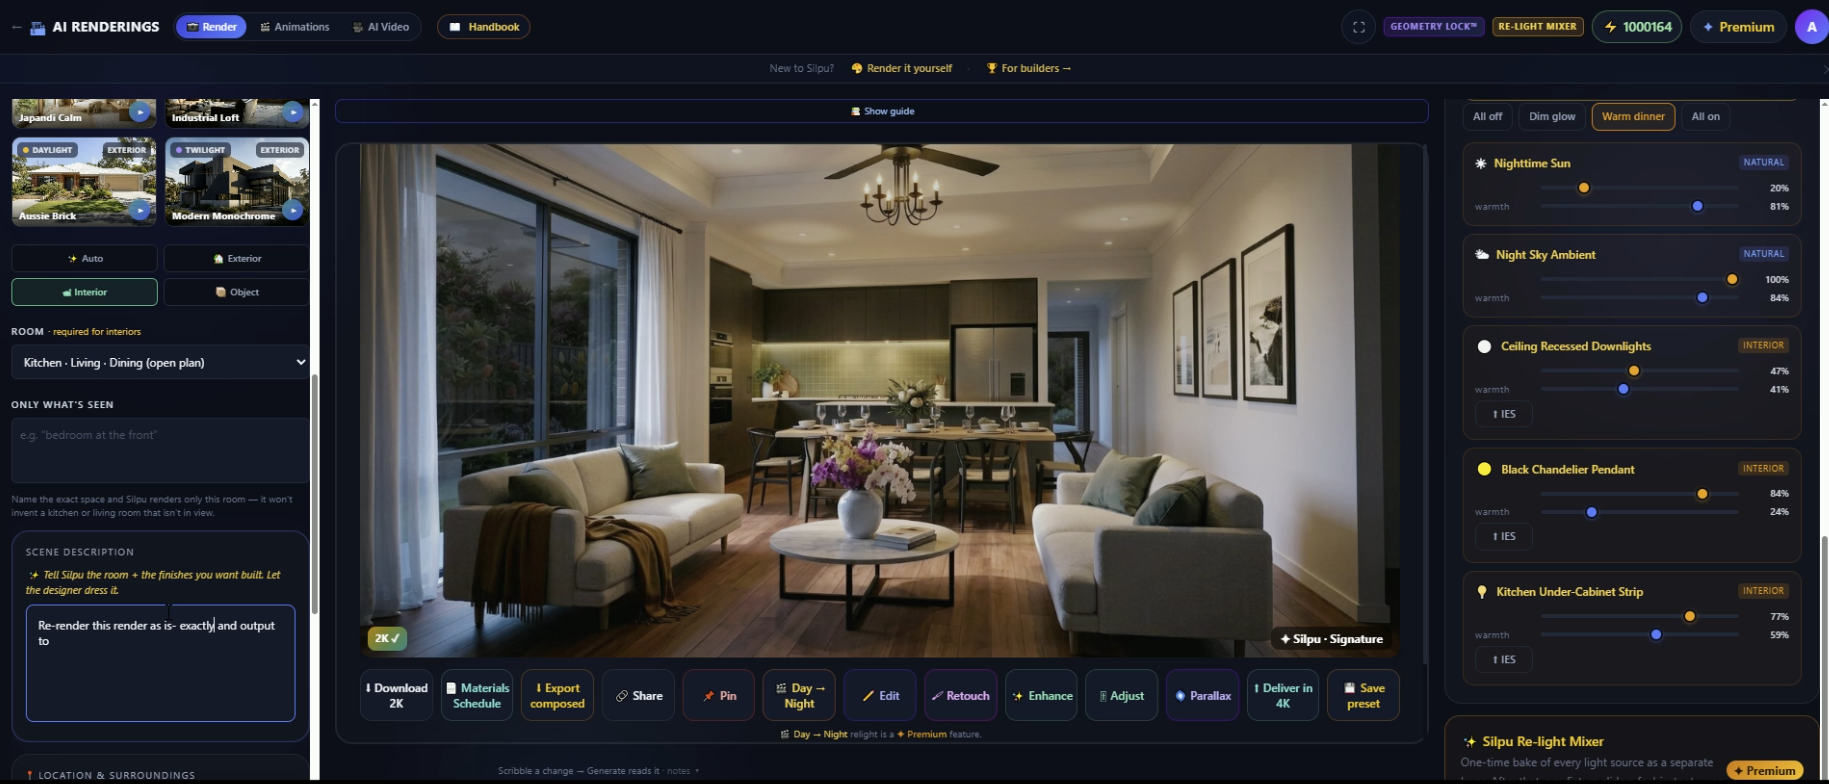
After you Bake the Re-light Mixer, each fixture becomes its own dimmable layer — and you can load its real .ies photometric file so the render matches the measured beam, cutoff and lumens, not a generic glow. That true-to-spec lighting is the lever interior designers feel first. See it worked through in the Coastal Calm lighting scheme.
Edit, Pin or Re-render? — what's what, and the prompts that always work
You'll learn: which tool changes what — and the exact wording that lands every time.
Three tools change a picture, and each has one job. Render makes the scene — use it when the model or camera changed. Edit changes one thing in a finished render and locks everything else — use it for that tree, that door, that wall. Pin attaches an exact product photo to an exact spot — the pin is the what and where, your edit words are the action. The habit to build: never re-render a picture you already like just to change one thing — a fresh render re-imagines everything; an edit touches only what you name.
- Remove something — "Remove the tree." That's genuinely enough: it takes its own shadow and reflection with it, and the background is rebuilt as though it was never there.
- Swap for an exact product — 📌 pin the product photo on the spot, then: "Remove the existing tree and plant the pinned tree in its exact place — full height and full crown, standing in front of the house." The new object grows to its true size — a foreground tree is allowed to stand in front of the facade, exactly like a real photo.
- Change a material — name the surface, name the finish: "The garage door becomes matte black." No need to describe where it is — its name is its address.
- Change one area only — outline it first (🎯 Precise area), then keep the words simple: "Re-clad this area in spotted gum." Your outline is both the fence and the full extent — the change fills it edge-to-edge and touches nothing outside.
- Exact counts & sizes — say the numbers you mean: "Add exactly three brass pendant lights over the island, 1m above the benchtop." Counts and dimensions are honoured literally.
- The spot is occupied? — just place the new thing: "Place the pinned dining table here." Whatever sits in that exact spot steps aside on its own — no need to ask for the removal first.
Tip One change per line, plainly worded. The engine treats your words as orders — "remove", "plant", "becomes", "exactly three" — so say the verb you mean and skip the apologies. And when a specific product matters, always pin its photo: a pin beats a paragraph.
Outline it, and it stays put An edit with 🎯 Precise area is confined: whatever sits outside your outline is put back exactly as it was, pixel for pixel. An edit without an outline is applied to the whole picture — the words still ask for one change, but the engine re-draws the full frame to make it, so light, textures or a distant detail can shift with it. If a change belongs to one place, mark that place first. It is the single habit that makes edits behave, and it is available on both the render screen and the standalone Edit page.
Rule of thumb Model or camera changed → Render. One thing in a good render → Edit. An exact product in an exact place → Pin + Edit.
Delivering to your client
You'll learn: how to turn a render into a client-ready package.
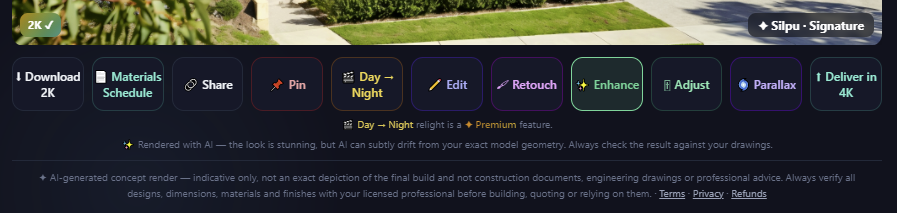
09a-deliver-actions.png
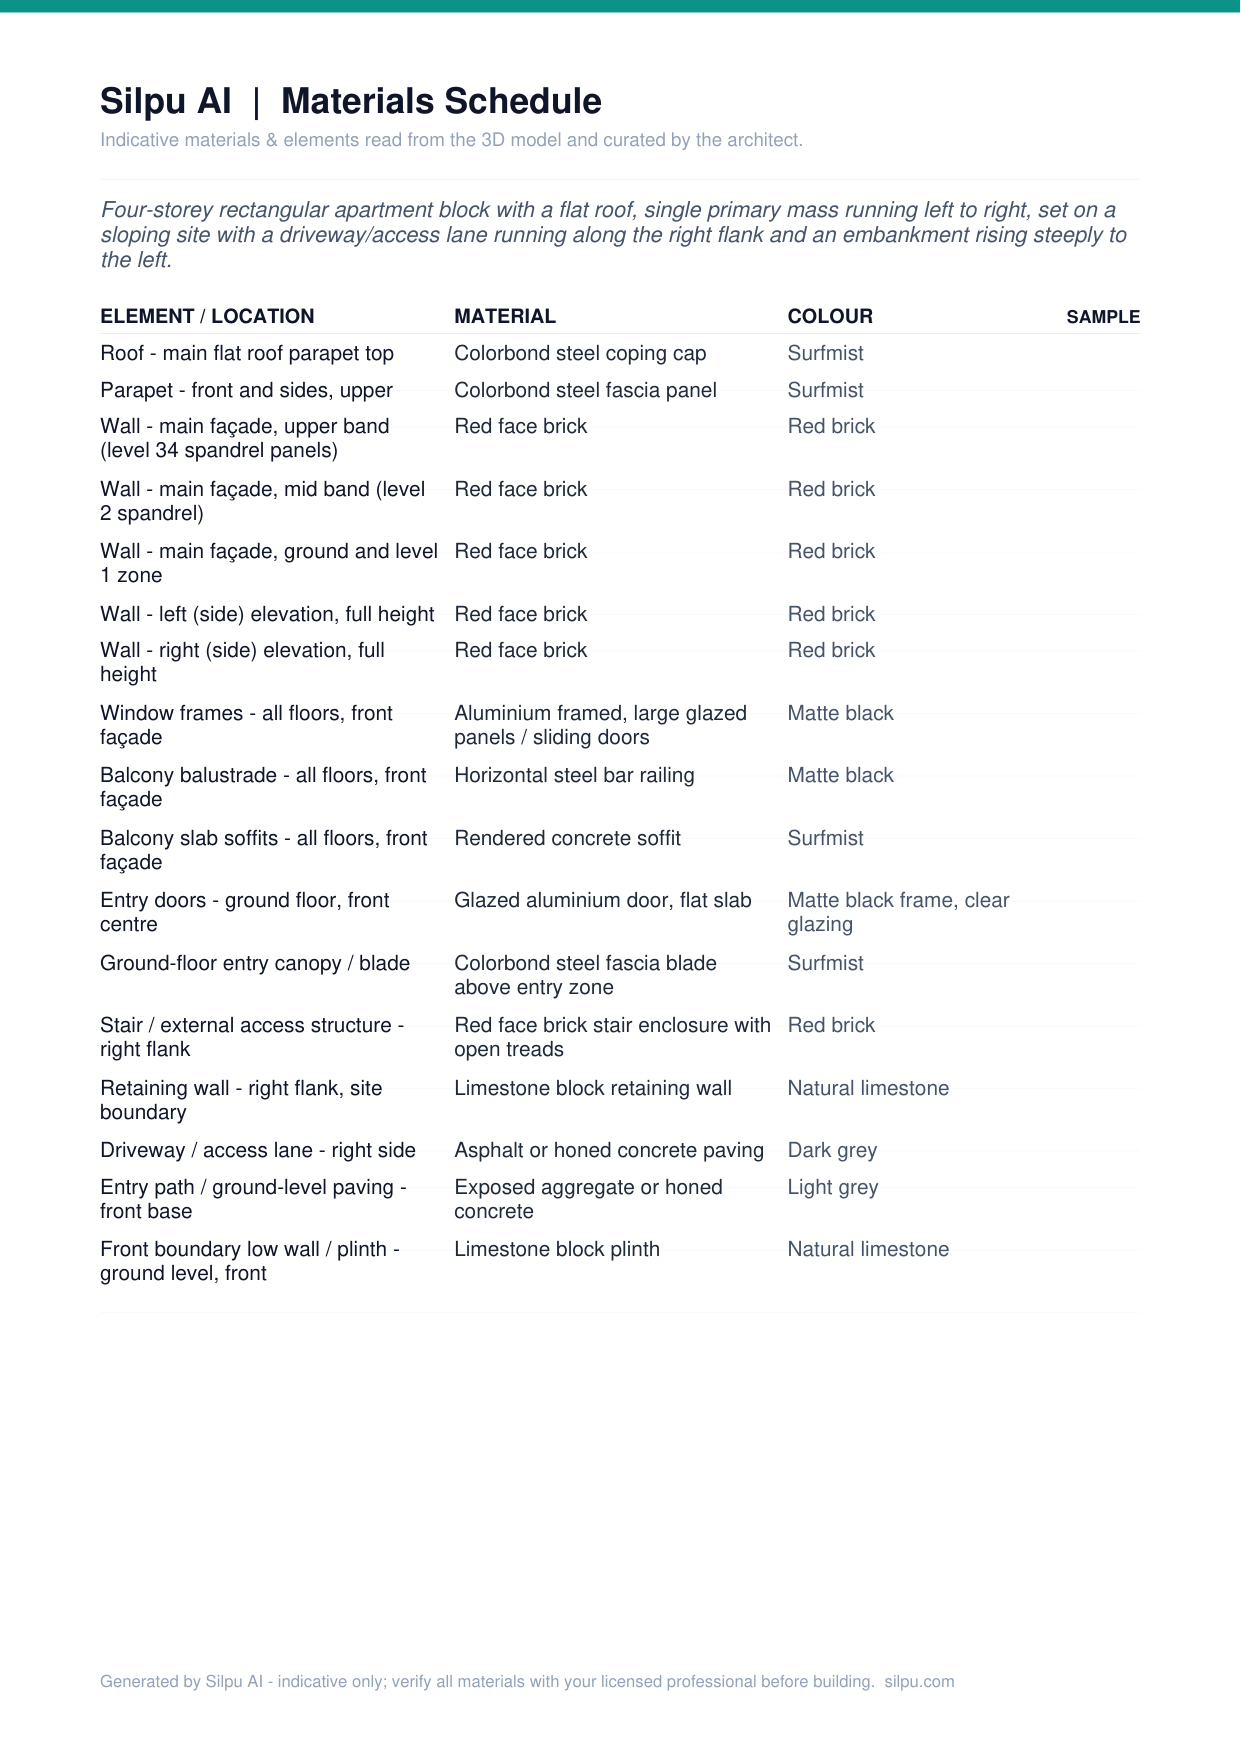
09b-schedule-pdf.png
- Download at 2K, or deliver higher resolution when you need it.
- Schedule of Finishes (PDF) — a branded, dated, client-ready document of every finish you specified. Free.
- Client's Material Board — an editable board of what the render was built from (a wishlist, not a costed estimate).
- Share a link, Pin to a board, or render a matching set of angles — same materials, light and mood across every view. Silpu keeps every angle's foreground clean automatically (no near-camera leaves drifting between shots) so the set reads as one consistent shoot — and cuts together seamlessly if you animate it (Lesson 10). Want the leafy photographic foreground? Render that view as a single shot.
Tip The render wins the feeling; the Schedule of Finishes wins the trust. Bring both to the meeting.
Bringing a render to life
You'll learn: motion — two ways to make a still render move.
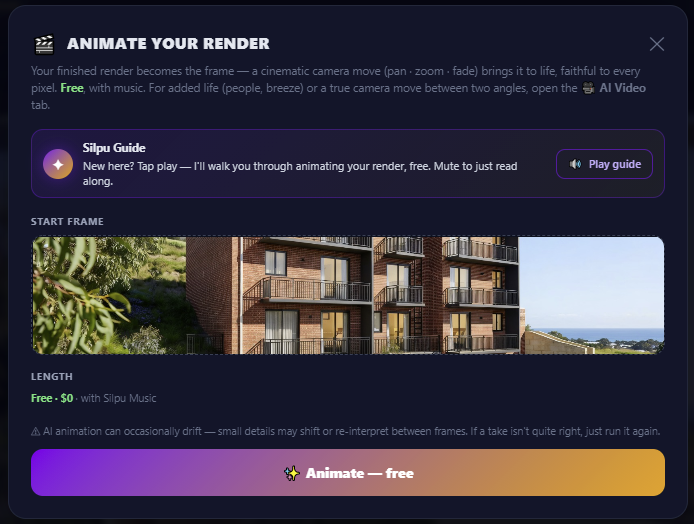
10-animations.png
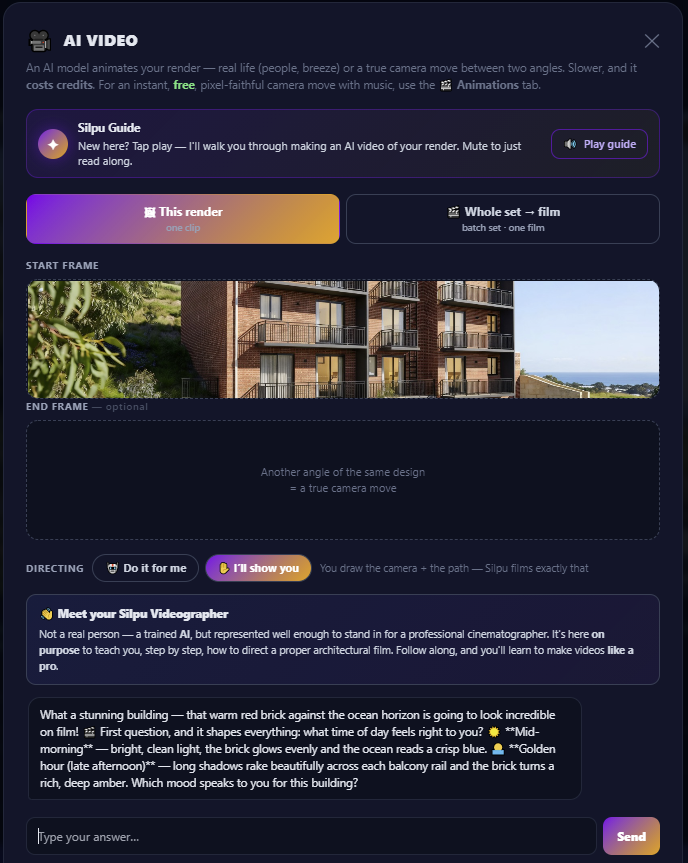
10b-ai-video.png
Two ways to move a still: free Animate (a faithful camera glide with music) · paid AI Video (real life + a guided film brief the Videographer plans with you).
- Open the Animations tab for a free cinematic camera move with music, faithful to every pixel.
- Open AI Video to add real life — a breeze, people, or a true move between two angles (paid).
- Keep it slow — a 15-second dwell on one great render beats a fast cut.
Tip Animate one strong render rather than stitching several. Motion should feel like the room breathing. And if you're moving between angles: matching sets come with clean foregrounds automatically — deliberate, so multi-angle moves cut together without leaves popping between frames.
Credits & plans
You'll learn: how paying works — simple, and in your favour.
- Free to try — no credit card. Start rendering straight away.
- Pay as you go — $1.00 per render, one flat price. Packs are simply 10, 30 or 50 renders; there is no per-tier maths and no cheaper rate to hunt for. Local currency is shown at checkout (₱60 in the Philippines, ₹95 in India, A$1.50 in Australia). Buy a top-up whenever you need one.
- Credits never expire — what you buy stays yours until you use it.
- Edits are free — every render comes with 15 Magic Edits, refilled each time you render. You never pay to get a change right.
- A few tools cost more than one credit — a Day → Night bake, for instance, is a single charge for the whole five-keyframe journey. The button always shows the price before you press it, and if something would take more than half your remaining balance, Silpu asks first.
- If a render ever fails, you're refunded — you never pay for an image you didn't get.
Tip The free plugins for SketchUp, ArchiCAD and Revit cost nothing — install them once and send views straight from your CAD tool. On any other software, the free standalone Silpu Studio app does the same job from your desktop. All downloads live at silpu.com.
Photography cheat-sheet & troubleshooting
Exterior — quick reference
- 3/4 hero angle · two faces visible.
- Eye-level for natural, lower for heroic.
- Verticals true — don't tilt.
- Building off-centre · sky breathes.
- Golden hour or twilight for warmth.
- Foreground path / planting leads in.
Interior — quick reference
- Corner view for depth, or dead-centre for symmetry.
- Camera ~chest height (1.2–1.4m).
- Window as the key light.
- Foreground anchor for scale.
- Verticals true · capture the space.
- Style lightly — a few props, not clutter.
For a magazine-grade render
- Angle first — the shot matters most.
- Declare finishes — don't leave materials to chance.
- Small light moves — sun angle & grade.
- Keep-list — protect the details you love.
- Let it breathe — space, not clutter.
If it doesn't look right
- Blurry / vague? Send a sharper, closer model screenshot.
- Wrong materials? Specify them in the Materials Schedule.
- Wrong mood? Change the time of day and re-grade.
- Something invented? Mark it up and add a keep-list.
- Still stuck? Iterate — edits and re-rolls are made for it.
The interface — a kit of parts
Every tool in the render app, numbered and grouped by where it sits on screen, with one line on what each does. Skim it once and you'll know the whole cockpit — and each tool links to the lesson that teaches it: tap any row (or its ↗ tag) to jump straight to it.
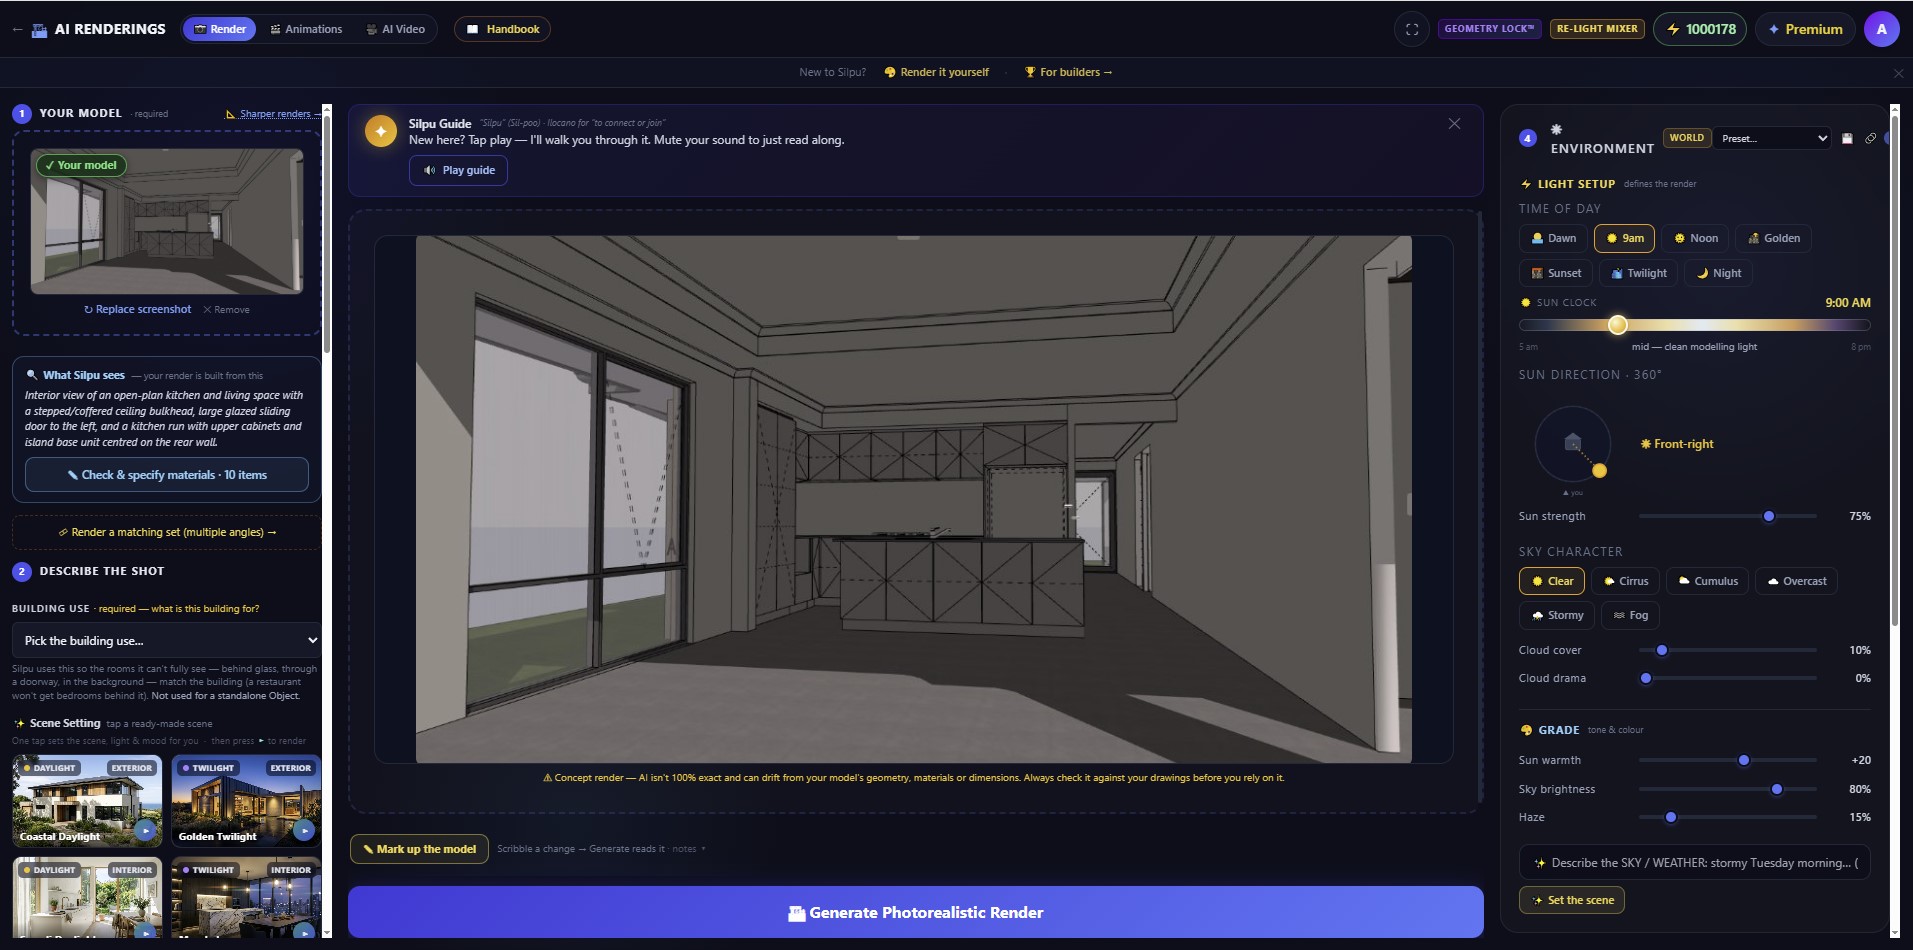
file: ui-overview.png
The top bar
The strip across the very top — switch what you're making, watch your credits, and manage your account.

file: ui-topbar.png
The input panel — "Describe the Shot"
Down the left: what you give Silpu to work from. This is where a render is won or lost.
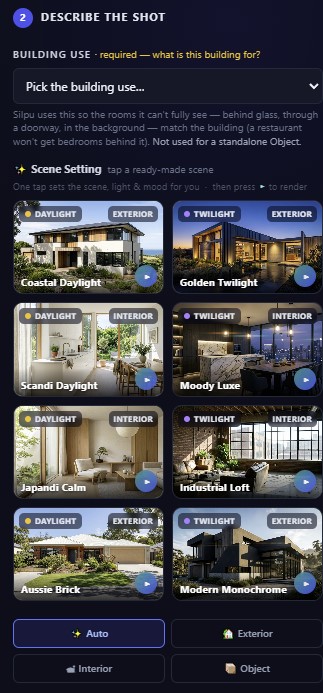
file: ui-input.png
Style & direction
The look of the image — photoreal by default, or a hand-crafted presentation style when you want one.
Materials Schedule
Declare your finishes instead of leaving them to chance — the single strongest lever you have.
file: ui-materials.png
The Drawing Board
Point at exactly where something goes — the fastest way to direct a render.
file: ui-markup.png
Environment — scene & light
The difference between a flat render and a magazine cover. Small moves here do more than big moves anywhere else.
file: ui-environment.png
Generate
Everything above, turned into an image.
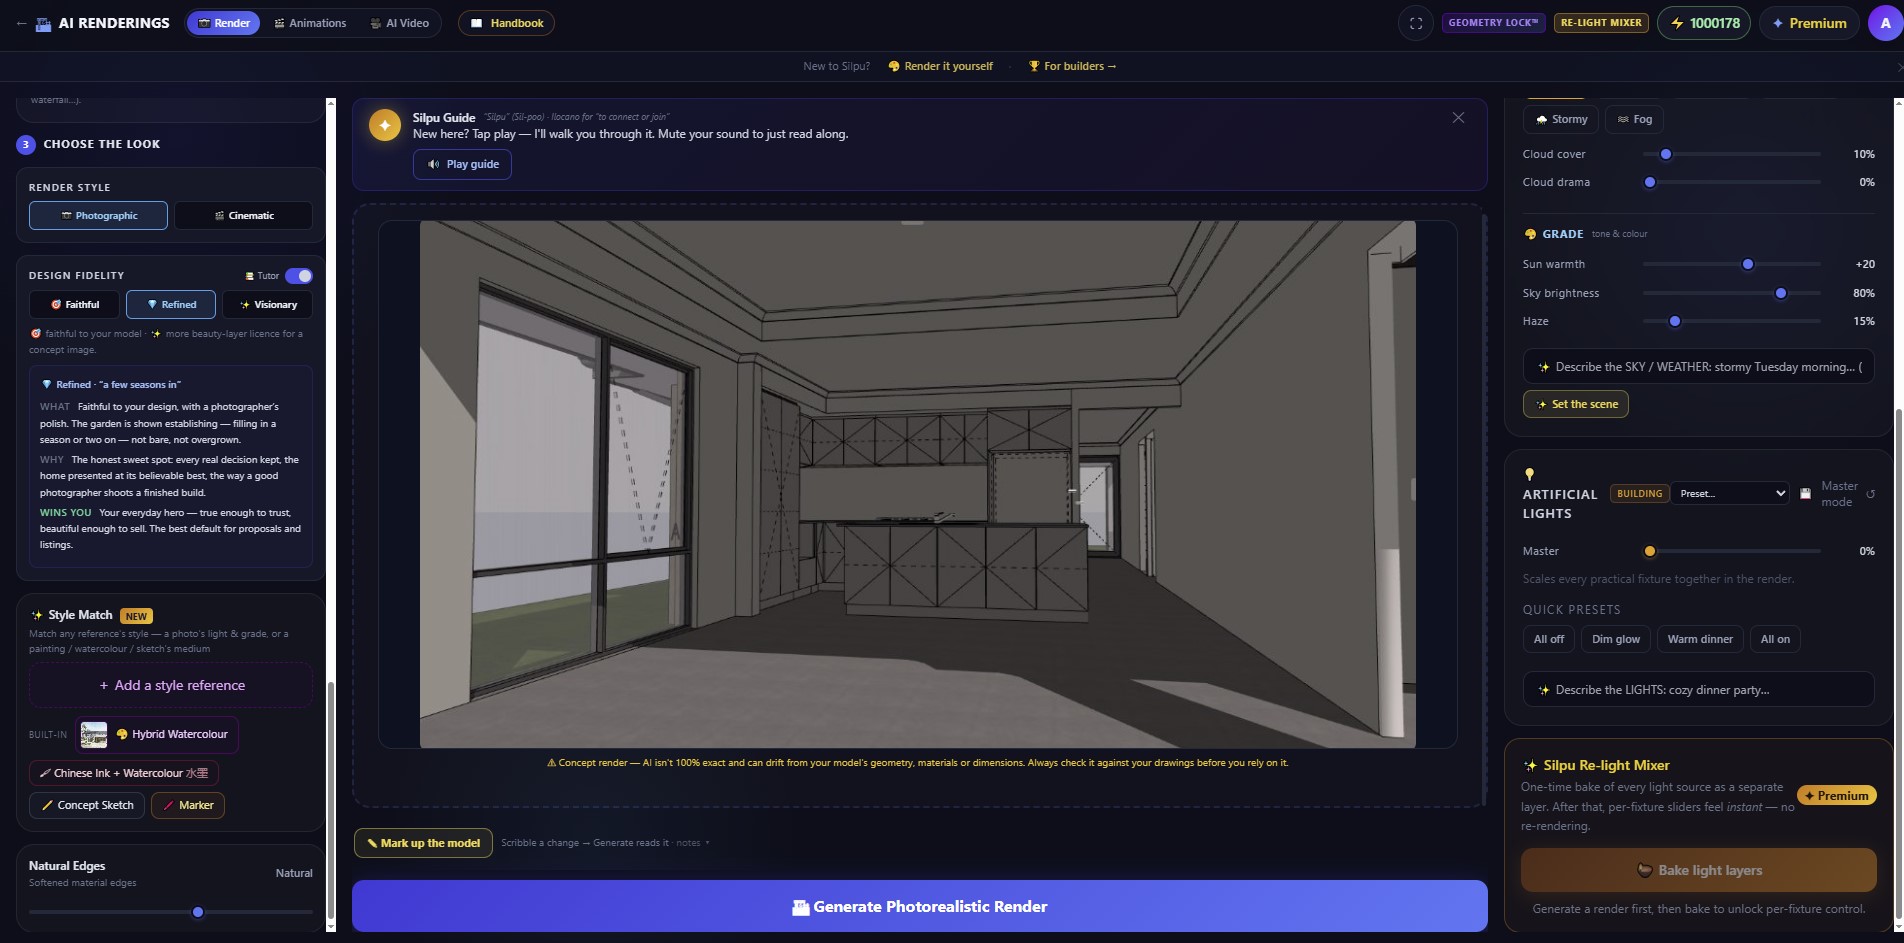
The result — view & deliver
Your finished render, and everything you can hand a client.
file: ui-actions.png
Finishing tools
Along the same action row — take a render from good to done. The instant ones use no AI and never drift your model.
The Edit room — Tasteful Edits
Open from ✏️ Edit (34). Make precise, targeted changes without re-rendering the whole scene.

file: ui-edit.png
Along the way
Help that rides with you.